

Bridge:
 Short Moustache Bridge Paganini Berlioz guitar The function of the bridge is to secure the strings in place at their end point, and to set string spacing and height. The bridge commonly has a piece of fret wire, or bone embedded in the wooden bridge to support the string. Sometimes the bridge bone is loose and removable; other times it is permanently inserted so that it is impossible to change the action (string height) without major surgery to the bridge, inserting non-period elements. Usually an action problem is not an issue with the bridge: it indicates that the neck needs to be reset by a professional luthier, or that the frets are too large (e.g. modern high-profile tall frets), or the nut needs to be raised, though occasionally string wear can lower it. |
|
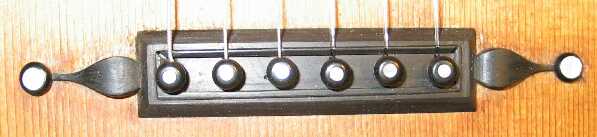
 Large Moustache Smile Marotel, Mirecourt (France), circa 1830 Guitar bridges were typically ebony wood. The modern guitar has higher tension strings, thus a larger bridge is required to distribute the stress over a wider area. The tips of the moustache are usually the tops of the bridge pins |
. |
 Vine Inlay Fabricatori, Napoli (Italy), 1811 The Early Romantic Guitar is often more ornate, often curving into a moustache shape, or even a vine inlay pattern. Today’s modern guitars have the same rectangular piece of wood for the bridge, whereas romantic guitars showed considerable variation and decoration. Fabricatore guitars, being among the oldest, carried forward the ornate vine inlays of earlier Baroque guitars. The vine inlay was made of ebony wood. |
 Vine Inlay Lavigne, Paris (France), circa 1819 collection of Len Verrett Some older French guitars also showed vine inlays, in more subtle patterns. Later romantic guitars dropped this decoration completely. |
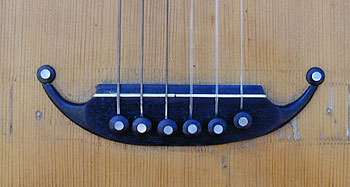
 “Cow Horn” Guiot, London, 1844 collection of Len Verrett The Panormo guitars, including others of that school, were a box bridge-saddle with a mother of pearl end. |
 “Cow Horn” Lavigne, Paris, ca. 1813 collection of Len Verrett Some earlier guitars, like this early Paris guitar circa 1813 by Lavigne, used the “cow horn” style before Panormo. |
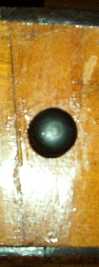
Bridge Pins were often used to hold the strings in place. Basically, there is a hole drilled in the bridge all the way through the top, into the body cavity. The bridge pin is a pointed small stick of wood with a decorative ivory or mother or pearl round dot on the top. To use it, you tie a knot at the end of the string, and thread the string through the hole toward the soundhole side, far enough down to clear the pin. The bridge pin wedges the string against the bridge, and holds it in place by catching on the knot. Surprisingly, this works fine – remember you are using lower tension strings, and tuning down.
You will see bridge pins on steel-string guitars, but they are very different, designed for ball-ended strings. The steel-string guitar bridge pin has a hole to thread the string through. The 19th century guitar bridge pin is a tapered wooden peg that holds the strings in place with friction by tying a knot in the string. Never put steel strings on a classical guitar; bridge pins do not indicate whether the guitar is steel or nylon strung.
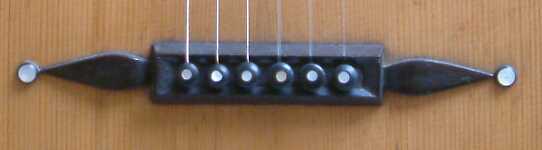
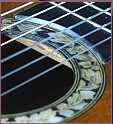
This photo shows a typical French school design, commonly called a “moustache” bridge. This is also a good example of typical bridge pins. This guitar has seen better days; the ends of the moustache do not meet up with the rest of the bridge, indicating it was replaced. The rectangular lines and filled holes indicate that a non-period bridge was installed and removed later when a period-style bridge was added. |
Saddle – This is where the strings rest against the bridge. On modern classical guitars, the saddle is a piece of bone or plastic that is basically rectangular in shape, and fits into a groove in the bridge. To lower the action, the saddle is filed down. Some shaping of the saddle is done, so it is best to leave this to a technician. On period guitars, there were several saddle types. One type is the same as the modern guitar, but it was sometimes made of ivory or ebony. The ebony saddles have a nice tone, due to the density of the wood, and in an experiment I was surprised at the difference it made. Other bridges were a rectangle box ridge, where the strings rest against the bridge. The disadvantage of this style is that the height (action) cannot be adjusted, but a modification sometimes done is to cut a groove and insert an ebony piece. Other saddles were a piece of metal, like a fret wire. A more primitive tie bridge just ends in the knot, with no saddle. The location of the saddle affects the string length, and thus the intonation as well.
Bridge Ties are used in modern classical guitars; the strings are tied to a block of wood with holes to feed the strings. The tie bridge was also used in Baroque guitars from the 1700′s and older. The tie bridge can also be found on early Italian guitars like Fabricatore. Spanish-style guitars use tie holes to secure the strings, which is most commonly employed today for classical guitars. I do not know whether this affects the sound; some people believe it does, others say it makes no difference. I heard the bridge pins distribute the stress of the strings onto the soundboard, whereas tie bridges focus the tension entirely on the bridge, but I do not know if this is true.
Action is the height of the strings from the fingerboard. Early guitars generally had much lower action than modern guitars, again, to make the guitar easier to play and more suited to rapid passages. Low action makes it possible to play fast passages with ease, with the slightest touch, and facilitates slurs and vibrato. The disadvantage of low action is that the guitar is not as loud, and you cannot push the guitar as hard before it starts to buzz. If the action is too low, the frets will buzz at even low volumes, and some frets may lay against the string and be unplayable. Higher action can sometimes improve tone, allow greater playing volume, and can remove many buzzing problems; however, the guitar becomes harder to play and accuracy suffers, especially for fast passages and upper positions. Action is set by the height of the the nut (the rectangular piece of wood at the top of the neck with string slots) and the bridge (where the strings end), as well as the angle of the neck. Sometimes the neck may need to be reset, if the effects of stress and climate over time have caused it to warp or pull in a certain direction. Such action adjustment is sometimes called “setup” – and is best left to someone who knows what they are doing to avoid buzzing problems.
Action is lowest at the first fret, and gets higher along the frets. Action is measured in mm at the 7th or 12th fret; it is around 5mm for most period guitars (from the fingerboard), the same as a flamenco guitar. Big classical guitars have action in excess of 7mm. Some guitars are very low action but do not seem to buzz: my Lacote 1847 copy and Guiot 1844 are 2.9 mm from the top of the fret to the bottom of the string on the treble side. Most guitars seem to be around 4mm on the bass side.
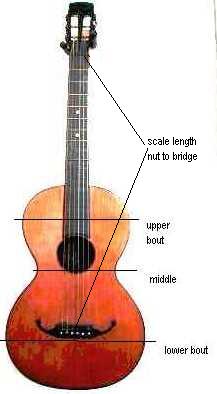
Bouts: The upper and lower bouts are the upper and lower high points of where the body curves at the highest points. The height and curvature of the bouts and the middle give the guitar its shape. Scale Length: Length of the string on the playing area, from the nut at the first fret, to the bridge where the strings end. You can measure this with a ruler yourself. Scale length affects the ease of play. It is much easier to stretch and reach gaps with shorter scales because there is less distance. Players often find some of the stretches in 19th century music of Sor and Giuliani to be nearly impossible for anyone with average hand size, but find these stretches easy on short scale guitars. On the other hand, the fingers can be too close together at higher frets for some players. The standard modern classical guitar scale is 650mm distance from nut to bridge. Some modern guitars are even 660mm scale, which was thought to improve volume and projection, but at the expense of playability. The scale length of early romantic guitars was typically shorter, 635 being perhaps the most common, but scale varies widely between 580-650, with most being 620-635mm. Staufer used 4 main string lengths, 640mm, 625mm, 607mm and 596mm. Virtually all Legnani style instruments by Viennese makers use either the 607 or 596mm scales, and Panormo around 630-635. Scale varied by maker, by country, and according to the original customer’s hand size. Guitars with a small body size and a scale length of 530-540 were likely Terz guitars. There are also, as with today, children’s guitars in existence. Surprisingly, the modern 650mm scale was a very common scale for French romantic guitars, but not for Spanish guitars. The body of French guitars is rather small, but the bridge is very low in the table, which gives a greater string scale and gives a characteristic sound for Paris or Mirecourt guitars. (From Francoise Sinier). Baroque guitars had similar construction, so it is not surprising to find early 19th century guitars with bridges toward the end. Also, Baroque guitars used typically 650 scale, so some early guitars were also 650. Some Baroque guitars were even longer, 660-670mm. Over time this was shortened, but by Torres’ day, 650 had become the standard again. |
Nut: The piece of wood at the top of the neck above the first fret, which elevates the strings from the fingerboard, and channels them to the correct tuner. A common problem is that the wood has shrunk and settled over time and the nut is now too low, thus causing the strings to buzz against the frets. The nut is usually made of ebony wood or ivory. This can be rectified by placing a shim underneath the nut, or replacing the nut with a slightly taller one of the same kind of wood.
The width of the neck at the nut was usually shorter than today’s standard classical guitars, but the same as today’s steel string and electric guitars. This can be an advantage or a disadvantage depending on the passage. It is easier to play some things, but in other cases it can be inconvenient because the fingers are more cramped. Practically, 4.2 cm is the minimum width, and I find this very difficult to play, and 4.4cm barely tolerable. 4.5cm is quite comfortable, and I have 2 guitars with this width. 4.7cm is my Lacote copy, which is superb. My Hill Panormo had 5.0 which was also good, and modern classicals are 5.2cm. It is the combination of the neck width, neck shape and thickness, scale length, and string tension that affects playability. Here is a chart of the major guitar types today, for comparison:
| Guitar Type | Nut Width | Scale Length |
| Gibson Les Paul Standard Electric | 4.15cm | 62.8cm |
| Romantic Terz Guitar, 1850′s | 4.3cm | 55.6cm (most are 53-54cm) |
| Lacote / French school | 4.5-4.7 (usually) | 62.5-63.5 cm |
| Viennese / Staufer school | approx. 4.4-5cm | 61-64.5cm |
| 1880′s La Corona parlour guitar | 4.3cm | 61.5cm |
| Italian Romantic School | approx. 4.4-5cm | 62-63.5cm (mostly 62.5cm) |
| Panormo School | approx. 4.5cm | 62.5-63.5cm (mostly 63cm) |
| Most Martin steel-string guitars | 5.1cm | 64.5cm |
| Antonio de Torres (1817-1892) | 5.1cm | 65cm |
| Standard Modern Classical Guitar | 5.2cm | 65cm |
| 1974 Larrivee Classical | 5.2cm | 66cm |
| Large Spanish Classical / Flamenco | 5.3cm | 66.4cm |
Neck: The oldest guitars, such as this 1804 Fabricatore, displayed the striped back which was characteristic of preceding Baroque guitars. Very commonly, the neck of 19th century guitars was painted black on the back. The neck is usually permanently glued and attached to the body as today. Stauffer invented the detachable, adjustable neck that allowed the action to be variable; it has 22 frets and floats over the top. The neck is a common repair. Over many years of time, it will bend and warp in different ways, sometimes pulling to one side, sometimes having a dip or a rise near certain frets, sometimes bowing inward, and sometimes straightening out. All these things are perfectly repairable; the neck can be re-bent or straightened by using clamps, heat, and pressure. Leave the neck adjustment to a luthier who knows what they are doing, as this is “major surgery”. To make things more confusing, individual builders have their own styles for neck placement. Most necks are intentionally bowed, and some guitars have high and low points to compensate for standing sound wave vibrations at certain frets. |

Fret Markers are dots that provide a visual queue to the fret number, just like today’s guitars. These were made of ivory, mother of pearl, sea shell, or similar materials. They were either embedded on the fingerboard, or on the side of the neck. Typically the 5th and 7th frets are marked. Personally, I cannot find my way around without some fret marking at least at the 7th fret, so I use little round sticky dots available at any office supply store, stuck to the side of the neck; they do not damage the guitar in any way and are removable. |
Frets: the pieces of metal that run along the neck at specific distances, depending on the scale length of the guitar. Early guitars, such as the Baroque guitar, had tied-on frets that moved. Frets help to assure accurate intonation of pitch by causing the string to be pressed at the exact point where the fret is located. Violins and other stringed instruments that lack frets rely on the player to accurately find the correct pitch intonation. In music, the first fret refers to putting your finger on the finger board between the nut and the first fret wire. Frets are made of metal, just like today.
All the early 19th century makers used different systems of unequal fretting, rather than the equally scaled fretting used today. Typically, original frets were not as tall, and were more square-shaped. “Martin Parlor Style” frets are a closer approximation to what was used. The frets were then trimmed and smoothed at the ends, so that they are not sharp and protruding along the neck, and also crowned and rounded somewhat so that moving the finger along the fretboard does not catch. Today’s frets are vary large and round.
The frets back then were not only more square, but also much smaller in profile. Modern frets are much taller than low-profile frets, which can cause buzzing problems if the wrong kind of fret is installed during restoration. The action was often set low, since the fret height was only around 1mm, thus giving the strings plenty of room to vibrate. Luthier Clive Titmuss provides the following information:
One issue … is the wear characteristic. Nickel steel frets found on modern instruments turn copper and gut strings into tattered remnants very soon. On the terz guitars I made I went to great lengths to have brass frets. I got some brass rods from the hobby store, about 2 or 3 mm in diameter, had a jeweler put them through a band press (which every jeweler has) to fit into a pre-cut slot, made with a hand saw which I use only for that purpose, specially sharpened and set. Then the frets are leveled, rounded and polished. They stand up from the fingerboard only 1 mm! The lowness of the fretting and the low action (Panormo and Terz) make the guitar ultra-responsive and more like the lute or tied frets on a period guitar, which have frets about .8 or .7 mm high. This changes the whole character. The wear problem is much reduced since brass is quite soft. I have my Panormo fretted in ivory, probably the best material, salvaged from pianos. With all these things in place you will have a new experience of fretting. More articulate. Less work to do. Better vibrato. Less string wear and intonation problems. But, less tension and softer.”
 |
 |
 |
|
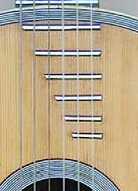
| Frets on Soundboard French 1820′s |
Glued Fretboard French 1850′s |
Staufer Raised Vienna 1840′s |
Fingerboard: a piece of wood sandwiched on top of the neck with cuts for the frets to be inserted. It was typically made of rosewood or ebony. Early 19th century guitar fingerboards ended at the 12th fret, level with the face of the guitar. Additional frets were placed on the top of the guitar, on the soundboard itself. During the second quarter of the 1800′s, the fingerboard started to be extended so that it lays glued over the top of the guitar, and more frets were added. A Stauffer innovation was the raised 22-fret fingerboard: it was attached near the 12th fret and elevated with a gap of about 1 cm between the fingerboard and the soundboard. The highest frets extended over the soundhole slightly. The fretboard tapers so that at the highest frets, only the top 2-3 strings can be played. In addition to providing more range, the raised fingerboard facilitates reaching the higher frets. See the Builders of the 19th Century page, Stauffer section, for examples.
Frets wear out over time; the vast majority of period guitars have been refretted several times. Leave this work to a professional. Some value may be associated to having the original frets intact, especially for a rare and expensive guitar, for example an original Stuaffer, Lacote, or Panormo. Once the original frets are gone, however, replacing the frets can only increase the value. It is not a good idea to put big, fat modern classical guitar frets on a period guitar. They are too big and look funny, there is not as much room per fret given the smaller scale, and the height may cause buzzing problems since the guitar’s design was built upon lower frets. Modern frets are certainly more comfortable and fine, but go with a lower profile, thinner fret wire – many kinds are available. Many guitars have had terrible fret jobs done, or show that someone has sanded them down inconsistently, etc.. I would not hesitate to have a good luthier un-do a bad fret job.
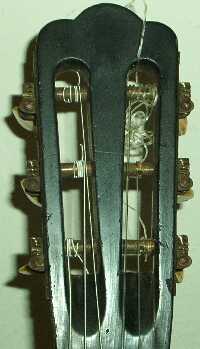
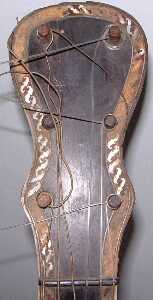
Headstock varies in shape. The “figure 8″ headstock is meant to look like the guitar body shape; it is a very attractive and interesting headstock. Stauffer guitars and other German / Viennese guitars introduced the “Persian Slipper” or “Clef” headstock. Fender electric guitars today still use this headstock shape. Panormo used a unique V-shape joint and lighter weight. Others are a variation on the modern headstock, but usually with thinner tuning rollers.
 |
 |
 |
 |
 |
| Panormo V-shape joint Machine Heads |
Paganini-Berlioz Guitar Figure 8 Guitar-Shaped Friction Pegs |
Common 19th c. Guitar Crowned Headstock Thin Tuner Rollers |
Staufer-Legnani Model Clef / Persian Slipper Metal Plate on Back |
Pons aîné, Paris (France), 1825 Figure 8 Guitar-Shaped Locking Wingnut Friction Pegs |

Tuners are very often solid ivory turning keys. The metal was often brass, and ornamented like today. The tuning mechanism has not changed much to the present day, though often the rollers were thinner. Modern machine head tuners were invented about 1820. Other guitars use wooden friction pegs, just like some of today’s flamenco guitars. It is thought by some players that wooden pegs change the sound, while others say it makes no difference. |

Friction Tuning Pegs were used exclusively before about 1820, but were also found in later designs, and are still used in some guitars today – especially flamenco guitars. It is thought by some that wooden pegs improve the sound, while others dispute this claim. They are tapered with higher diameter toward the peg, and lower diameter toward the end. They work by pushing the peg in the wooden hole; friction keeps it tight. To tune, you pull the peg out slightly, tune to pitch, then push it in while being careful not to turn it. There is a “trick” to using them. Pegs have a nice aesthetic, they are light in weight, and allow you to rapidly tune from slack to pitch. The downside is they can slip, thus slacking the string, it’s harder to tune them without moving the pitch, and they aren’t as precise as mechanical tuners. |
Pegheds sells mechanical pegs which can be used as a substitute for wooden friction pegs, using a planetary gear system. Most guitar pegs are 9mm, the same as a viola. Early guitar pegs were the same style as stringed instrument pegs for violin or viola. In fact, viola pegs are also 9mm at the base.
“The Trick” to tuning pegs according to Clive Titmuss: “Pegs: The trick is a three finger technique; hook your middle finger over the face of the peghead and pull while tuning. The pegs [must be] perfectly round and perfectly fitted to the hole, [and] properly dressed. When you learn the trick they will easily hold the tension. Make sure the coil is slightly scissored against the peg head surface to prevent popping. Pegs won’t work if the coil is too high. Down bearing is also affected.”
It is frustrating trying to push in with only your fingers while turning under pressure. The Peg Winder commonly used to wind up mechanical tuners is essential for winding pegs, hence the name. Under higher tension, the pegs must be shoved in tighter to hold pitch. Then when you get the right pitch, I usually lose it by the time I get the peg shoved back in. It’s a clumsy device, with the slightest micro-turn varying the pitch wildly. If it’s not in all the way, beeeeeeeeeew, it quickly unwinds completely. Then the string is slack, which makes it go out of tune more often as it re-stretches. I’m glad somebody invented mechanical tuners. I’ve gotten more skilled at tuning with pegs, but it’s still a problem. There are dry lubricants that may assist. Lower tension strings are easier to tune with pegs.

Woods used were typically spruce for the top, just as today. The most common wood for back and sides was maple; many guitars have very beautiful tiger stripe or swirled natural patterns of flamed or curly European maple. During the mid 1850′s, maple was still the most common, and even Tarrega’s instrument had a maple back. However, many other woods were used, such as Pearwood and Mahogany, depending on what was readily available. |
| Brazilian Rosewood was used in some period guitars; in fact, many pieces of antique furniture from this time period are also made of Brazilian Rosewood. During those days, this wood was plentiful, with old growth trees right on the coast line, with trade routes to Europe. Originally it was chosen because it was cheap and plentiful. Today, tradition dictates the wood choice, even though Brazilian Rosewood has gotten quite expensive.The same goes for Flamenco guitars today. They were originally built from Cypress, not because Cypress had a better sound, but because Cypress was cheap, plentiful wood that was used in everything from coffins to furniture. Flamenco guitar players were not typically wealthy, and the inexpensive woods were the primary consideration. Each wood has its own tonal characteristic, and even though the original reason for choosing it had nothing to do with tone, the prevailing chosen wood’s tone subsequently shaped the music of the day, so that a certain style of music came to be associated with certain tonal woods, which drives current tradition.
The top and back were sometimes one piece, possible in part to the smaller size of the instrument, as well as more plentiful old wood supplies. In other cases, the guitars have two-piece tops and backs. |
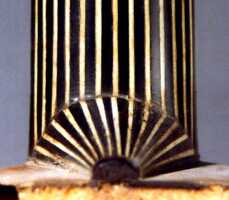
Bracing
 Spanish (1832 Louis Panormo) 7-Fan Bracing photo: Arthur Robb |
 A. Stauffer & Comp., ca. 1825 Ladder Bracing photo: Bernhard Kresse |
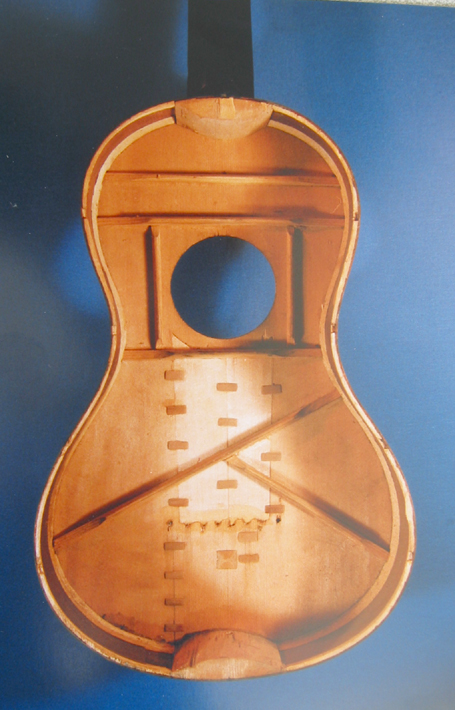 Lavigne, Paris circa 1815, Pons-style Y-Bracing photo: Sinier de Ridder |
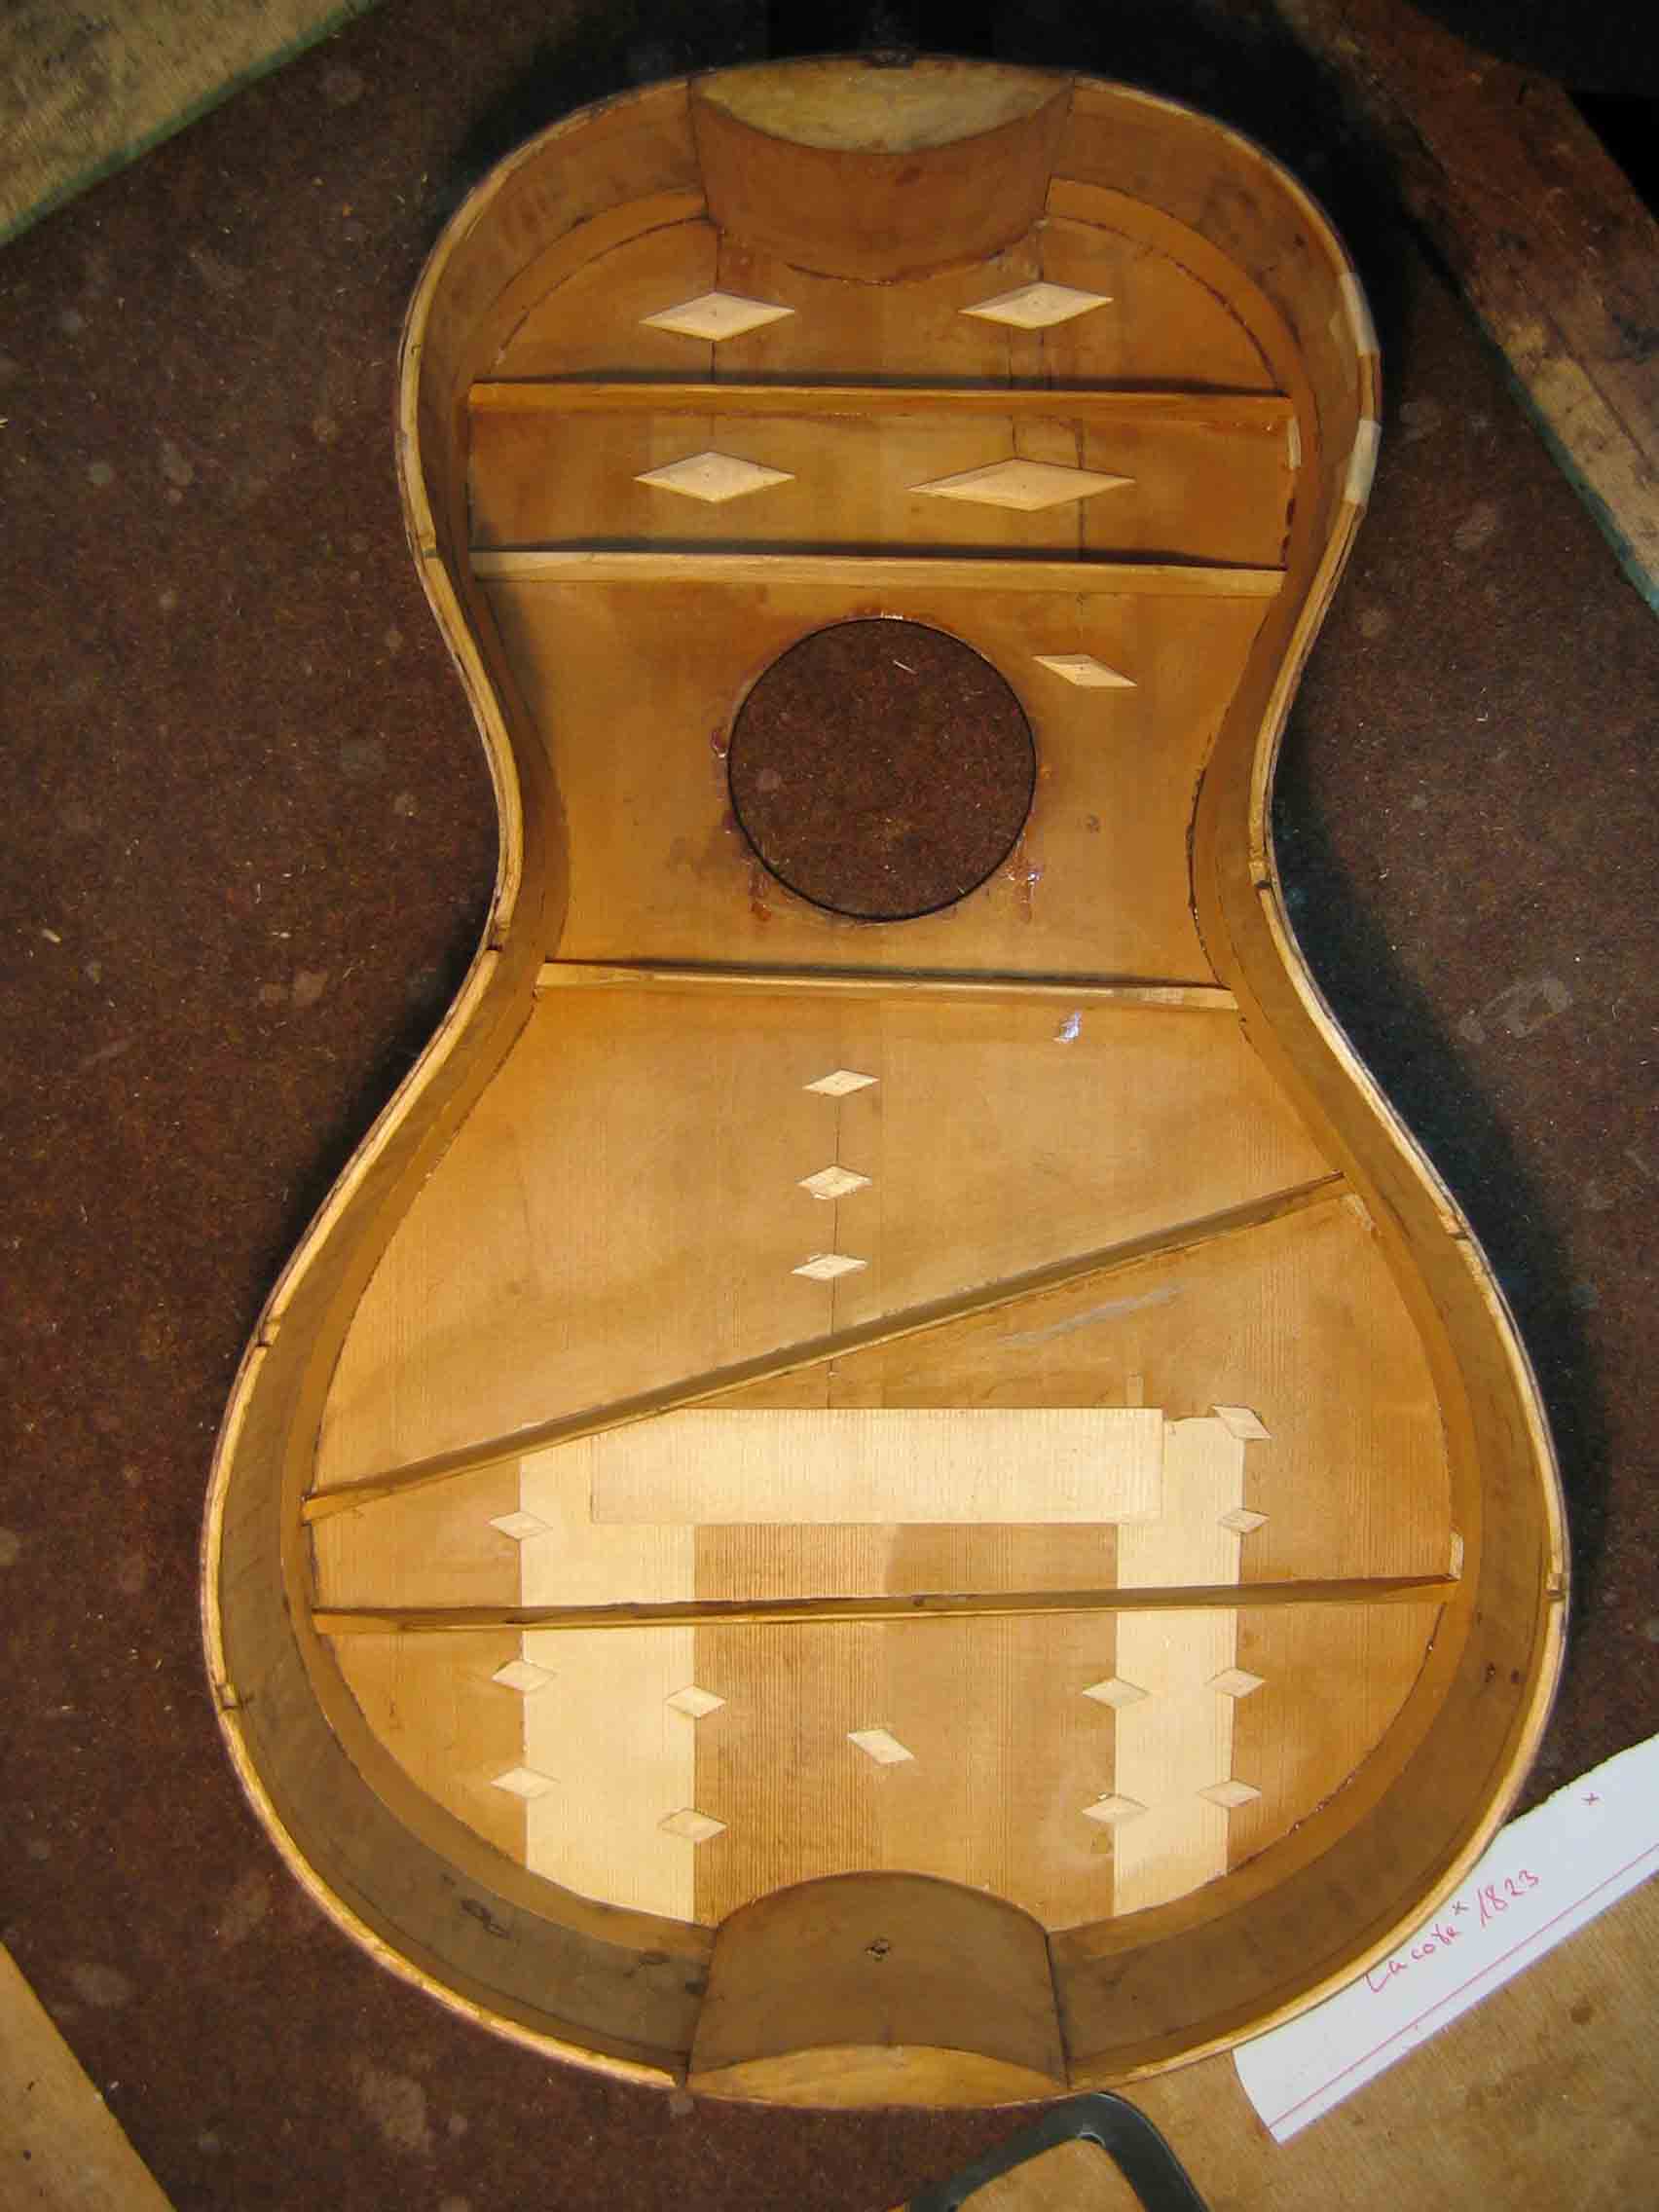 1828 Lacote, Paris Slanted Ladder Bracing photo: Bernhard Kresse |
Bracing is inside the guitar, to hold together the soundboard under tension. The bracing style makes a huge difference in the sound and is a large part of what separates the major schools of construction. The size, shape and depth of the guitar body also affects the sound, perhaps more so than tweaking the bracing.
Many romantic guitars were “ladder” braced, e.g. it looks just like a ladder. Spanish guitars throughout the entire 19th century used mostly a “fan” bracing system, which Torres-based guitars still use today (Torres changed their distribution, and so forth). Fan bracing was typical of Spanish guitar construction dating back to at least the 1700′s. Panormo’s guitars were advertised “in the Spanish style” – hence fan bracing. Torres used the Spanish fan bracing system. Many builders experimented with bracing, as they continue to do today, in an effort to find a “better” sound, or at least a “unique” or “particular” sound. Lacote used a slanted bar, Pons and other early French builders used a Y-shaped brace, Spanish fan bracing varied from 3-5-7 fans, etc., and all sorts of combinations inbetween. Staufer used ladder bracing.
As Alain Bieber points out, “Since I begin to study ‘in depth’ the ‘romantic models I have more and more the feeling that one should not oppose the ‘simple’ ladder braced models to the ‘complex’ fan braced models. That is slightly unfair to ladder braced designs that where as varied and refined as their contemporary fan braced designs. Even more, take the two most known French masters, Lacote and Laprévotte, the first one used a not so simple and very personal ladder design, the second one a completely different longitudinal bracing, likely inspired by the quatuor instruments. There was more diversity of output and styles of making guitars in Europe before the Spanish ‘triumph’ than after.”
Varnishes used were often Shellac, which is basically insect resin and tree sap. It was used as a food coating back then, and still is today (most people have no idea what they are really eating….). It is very brittle and tough; ideal for protecting a musical instrument, and ideal for transmitting sound, since softer materials will dampen the sound wave but brittle materials will reflect it. The guitar’s break-in or “opening up” period has more do with chemical breakdown of the finishing than wood vibration. Shellac was also used as a clothing dye, and depending on the type of shellac, some kinds can have vivid colors. Guitar shellac is more muted, but it does change the color slightly more yellowish. Commonly, the shellac would be mixed with walnut oil and liquor, or a “spirit varnish”. Literally, you could dip apples or candy in the guitar varnish and eat it – talk about environmentally friendly! Today’s guitar varnishes are usually poisonous. Shellac varnishes are still available today on some custom guitars. Other varnishes were egg-yoke based. Varnishes were usually custom-made by the luthier, using available organic materials, and were closely guarded secrets. Their composition varied considerably between guitar makers. Keep in mind if you ever re-finish a period guitar, that you will remove the original varnish, and forever change the sound – for better or worse.
Glues were natural animal hide glue, which is still available today. It is best to stick with similar glues and materials during restoration. Animal glue is of course environmentally friendly and less poisonous than today’s synthetic glue, although of course the bonding strength and other properties are not as desirable.

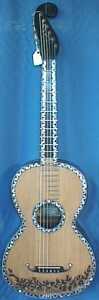
Purfling is the decoration that runs around the edge of the guitar. Sometimes purfling was painted on like today, but more commonly it was comprised of very thin sandwiched layers of wood, or intricate, interlocking saw designs of wood. In this case, thin sandwiched layers of wood. |
 |
 |
 |
 |
|
 |
 |
|
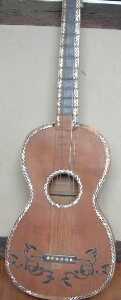
| French guitar Circa 1840. |
French guitar Circa 1850. |
Rosette: the decoration around the sound hole. It can be painted on, or sometimes it is
the same style as the purfling. Many guitars used mother of pearl or sea shell inlays. The luthier’s fine craftsmanship was often displayed by the skill of the Rosette. It remains to this day the one decorative, ornamental piece of a guitar which varies by luthier. |
Strap Button: Many guitars have a wooden button at the bottom of the guitar, even high-end concert guitars. The strap was made of leather or cloth, attached at the strap button like today, and the ends were tied at the headstock. Many players, even Mauro Giuliani, are depicted using straps in those days. This is an important part of the guitar, and you should not remove it, even if you do not use a strap. |
Tension is the looseness or tightness of the string. Early guitars had lower tension, again to improve ease of play, but at the expense of volume and projection. The string tension on the first string is typically around 6 kilos per string, compared to 8.5 kilos per string for modern classical guitars. See strings and tuning sections below.
Weight is due on the size of the instrument, wood thicknesses, and wood types. The early romantic guitar weighs around half the weight of a modern classical guitar.
http://www.earlyromanticguitar.com/erg/components.htm


